How to Live Debug a Linux Kernel in Ubuntu Server
gdb についても、何とか使えるレベルにはなってきたので、Linux カーネルのデバッグにも手を出してみることにしました。Windows であれば、普通にインストールして bcdedit でカーネル デバッグを有効にするだけでいいのに、Linux だと相当めんどくさいです。しかも人によって実行しているコマンドがばらばら・・これだから Linux は困る。いろいろと検索すると、Linux のカーネルをソースからビルドしてインストールしている人はたくさんいるようですが、カーネルをデバッグしている人となると、一気に数が少なくなる気がします。
最初は、Hyper-V の仮想マシン上にインストールした Ubuntu Server に対して、仮想のシリアル ポートを追加して、Hyper-V ホストの Windows から名前つきパイプ経由でデバッガーを直接繋ぐ環境を作りました。できるにはできたんですが、2009 年に kdb と kgdb が統合された際、kdb 上で逆アセンブルするためのコマンド id が削除されていました。それだけでも論外なのですが、さらに kdb というデバッガーは gdb とは異なるコマンド セットを持っています。したがって現在の主流は、gdb を使ったリモート デバッグであり、ローカルの kdb に直接繋ぎに行くのは非常に特殊な場合に限られそうです。
KDB FAQ - KGDB Wiki
https://kgdb.wiki.kernel.org/index.php/KDB_FAQ
となると、Hyper-V で環境を作るのが一気にめんどくさくなります。gdb でリモート デバッグを行なうということは、debugger と debuggee の 2 台の Linux が必要になるということです。原理上当然ですし、Windows のカーネル デバッグも同じなので何も文句は無いのですが、問題は Hyper-V の仮想マシン同士をシリアル ポートで繋ぐ簡単な方法がないことです。Hyper-V では、仮想シリアル ポート デバイスを Hyper-V ホストの名前付きパイプにリダイレクトすることができます。しかし試してみたところ、2 つの仮想マシンで 1 つの名前付きパイプを共有して、仮想マシン同士をシリアル通信させることができませんでした。
以下の情報から、2 台の仮想マシンがそれぞれ別の名前付きパイプを使い、Hyper-V ホスト側でそれらの名前付きパイプをリレーするようなプログラムを動かすという方法がひょっとすると可能かもしれませんが試していません。
http://stackoverflow.com/questions/4973554/hyper-v-connecting-vms-through-named-pipe-loses-data
一方、VMware のハイパーバイザーでは、2 台の仮想マシンが 1 つの名前付きパイプを共有することが可能なので、大昔にインストールした VMware ESXi の環境を使うことにしました。いつも通り、OS は Ubuntu Server 14.04.1 を使います。
手順の流れは以下の通りです。
- ESXi 上に 2 台の仮想マシンを用意し、Ubuntu Server をインストール
- Debugger 上に Linux カーネルのソースをダウンロードし、ビルド
- 動作確認のため、ビルドしたカーネルを Debugger 上にインストールして再起動
- 必要なファイルを Debugger から Debuggee にコピー
- Debuggee 上でブートの設定を行ない、シリアル コンソールからカーネル デバッグを有効化
- Debugger からデバッグ開始
まずは ESXi の環境に仮想マシンを 2 台用意し、以下の設定で仮想シリアル ポート デバイスを追加します。
- Debugger - デバッグする人
Pipe Name: linux-debug
Near End: Client
Far End: A virtual machine - Debuggee - デバッグされる人
Pipe Name: linux-debug
Near End: Server
Far End: A virtual machine

Debugger
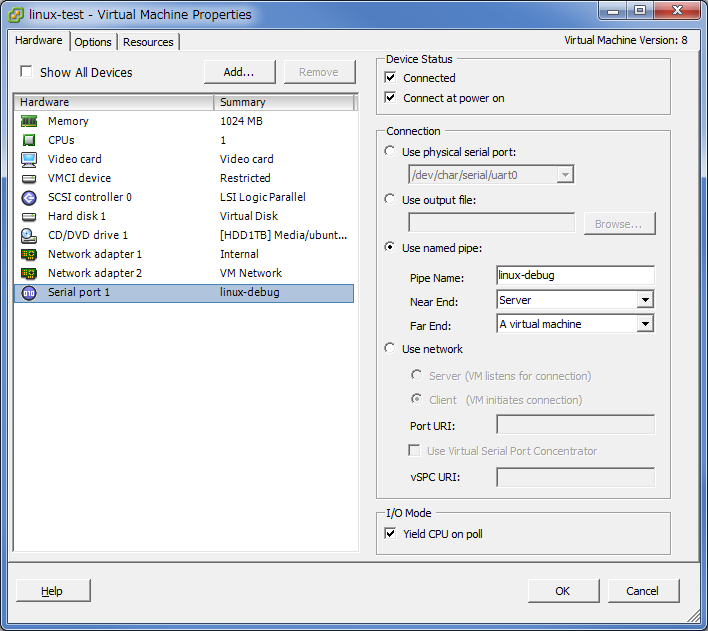
Debuggee
Ubuntu Server のインストールでは特別な設定は不要です。OS が用意できたら、次に Linux カーネルをソースからビルドします。ソースは git リポジトリからクローンしてもいいのですが、かなり遅いらしいので、kernel.org からダウンロードします。2015/1/10 現在の最新は 3.18.2 でした。
The Linux Kernel Archives
https://www.kernel.org/
カーネルをビルドするコマンドは人によって千差万別で、どれを使うか迷いましたが、以下のコマンドで落ち着きました。
$ uname -a
Linux linux-dev 3.13.0-32-generic #57-Ubuntu SMP Tue Jul 15 03:51:08 UTC 2014 x86_64 x86_64 x86_64 GNU/Linux
$ sudo apt-get install build-essential libtool manpages-dev gdb
$ sudo apt-get install kernel-package libncurses5-dev
$ wget https://www.kernel.org/pub/linux/kernel/v3.x/linux-3.18.2.tar.xz
$ tar -xvf linux-3.18.2.tar.xz
$ cd linux-3.18.2/
$ cp /boot/config-3.13.0-32-generic .config
$ make oldconfig
$ make menuconfig
$ sudo make-kpkg clean
$ sudo make-kpkg --initrd kernel_image kernel_headers \
> --append_to_version=-poodim -j2
少し補足です。
- kernel-package
make-kpkg コマンドのために必要です。このコマンドで、Debian パッケージを作ってインストールします。 - libncurses5-dev
make menuconfig コマンドのために必要です。 - cp /boot/config-3.13.0-32-generic .config ; make oldconfig
最初に、現在のカーネル設定を元に設定を作ります。一から設定してもいいのですが、互換性維持のためと、設定項目が膨大すぎるためです。というかみんなやってるし。 - make menuconfig
メインの設定はここでやります。好きなだけ弄っていってね! - –append_to_version=-poodim
作るカーネルのリリース名のサフィックスを好きなように設定できます。例えば今回のコマンドだと、カーネルのリリース名が “3.18.2-poodim” になります。 - -j2
コンパイル時の並列実行数の設定です。ビルド環境の CPU コア数に合わせて設定してください。どれだけ効果があるのかは分かりません。私はこういう設定ではいつも コア数x2 にするようにしています。
menuconfig では、どこも設定を変更する必要はありませんでしたが、カーネル デバッグに必要な項目が有効化されていることを必ず確認しておきましょう。
- Kernel hacking –> Magic SysRq key –> (0x1) Enable magic SysRq key functions by default
- Kernel hacking –> Kernel debugging
- Kernel hacking –> KGDB: kernel debugger –> KGDB: use kgdb over the serial console
- Kernel hacking –> KGDB: kernel debugger
–> KGDB_KDB: include kdb frontend for kgdb –> KGDB_KDB: keyboard as input device
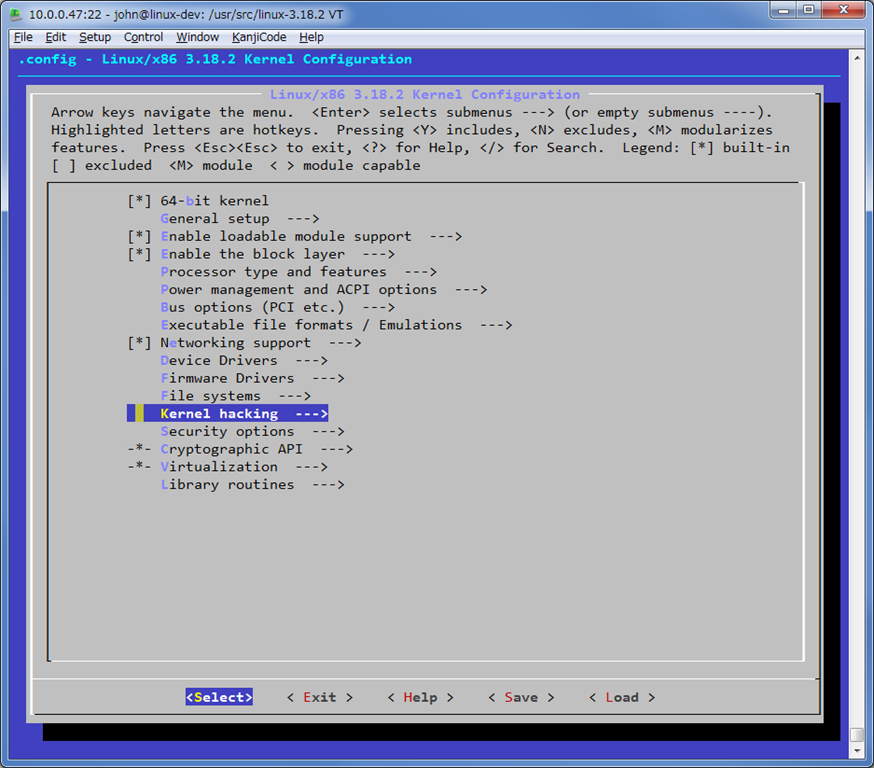
menuconfig のトップ画面 - Kernel hacking を選んで Enter
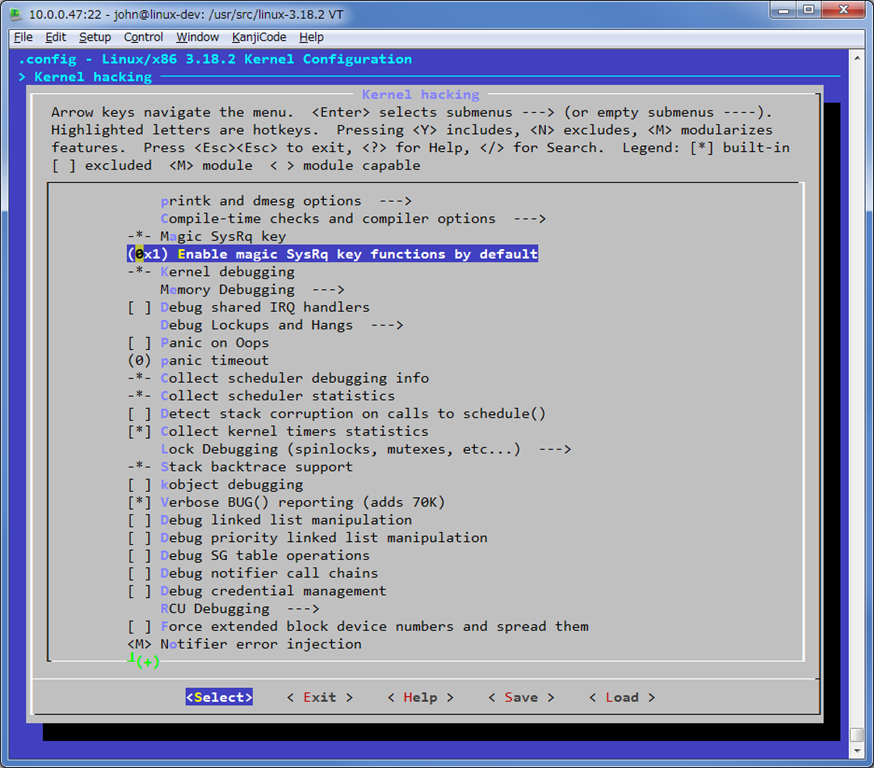
Kernel hacking 画面 - SysRq と Kernel debugging が有効であることを確認
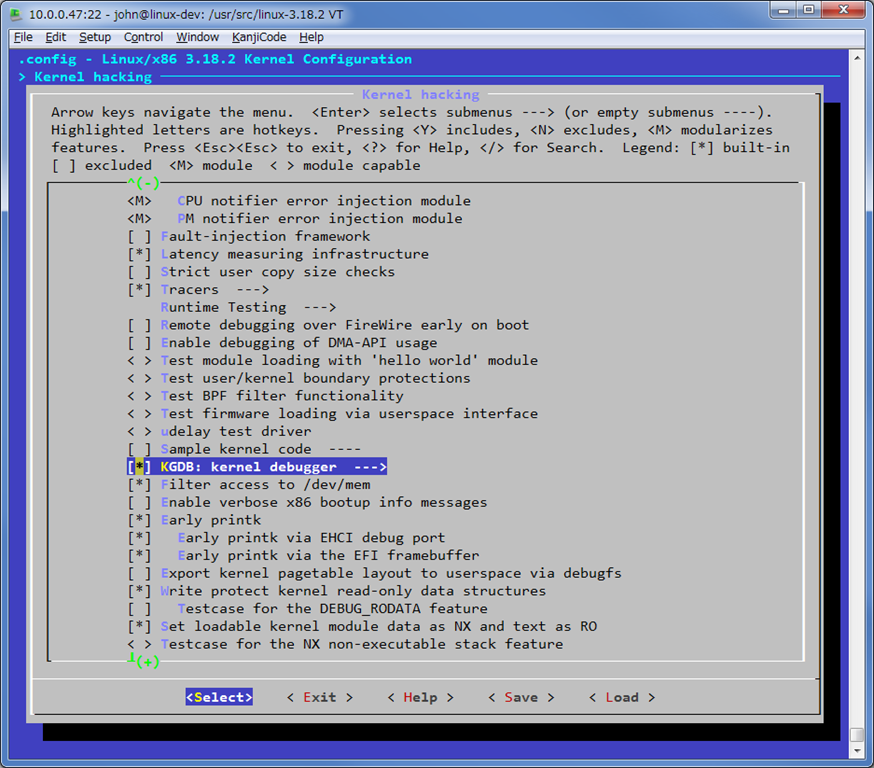
Kernel hacking 画面 - KGDB を選んで Enter
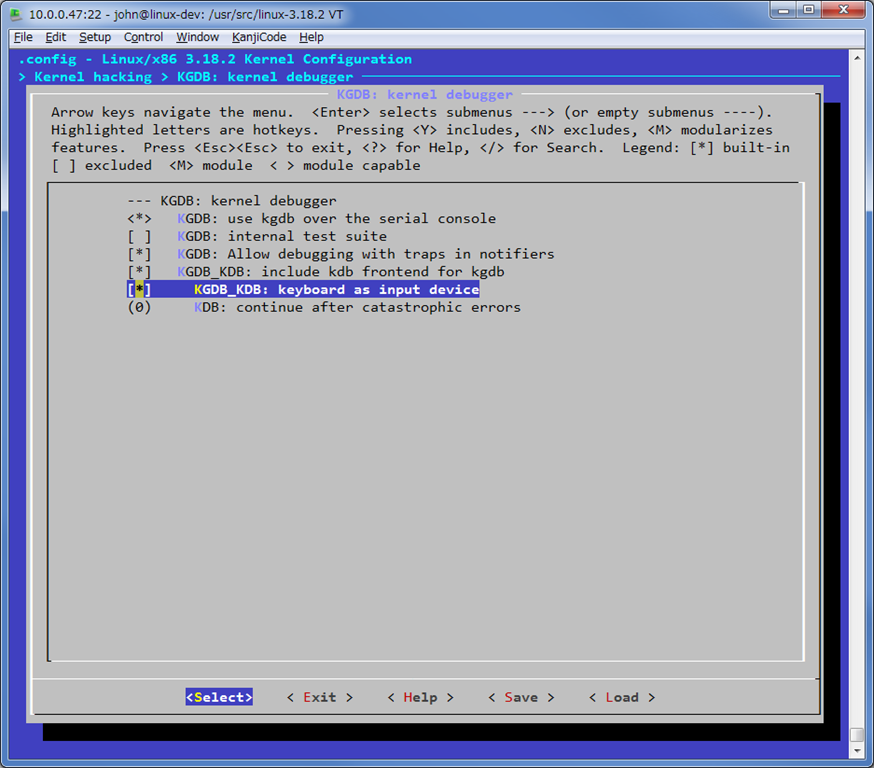
KGDB: kernel debugger 画面 - kgdb が有効であることを確認
Ubuntu のサイトにもカーネルのビルド方法の情報がありますが、kernel.org ではなく Ubuntu のリポジトリにあるソースを使うみたいなので、あまり参考になりません。一応リンクを掲載しておきます。
Kernel/BuildYourOwnKernel - Ubuntu Wiki
https://wiki.ubuntu.com/Kernel/BuildYourOwnKernel
以下のページには、メジャーなディストリビューションで使えるコマンドが紹介されています。分かりやすい。
How to compile and install Linux kernel in Ubuntu/Debian and RHEL/CentOS | Rui’s Blog
https://coelhorjc.wordpress.com/2014/12/05/howto-upgrade-to-latest-kernel-in-ubuntu/
ビルドはけっこう時間がかかりますので、のんびり待ちましょう。なお、いくつかのサイトではビルド時に sudo ではなく fakeroot を使うように書かれていましたが、fakeroot だと以下のパーミッション エラーが出たので sudo にしました。
$ fakeroot make-kpkg --initrd kernel_image kernel_headers --append_to_version=poodim -j4
                System.map "/usr/src/linux-3.18.2/debian/linux-image-3.18.2poodim//boot"
run-parts: executing /etc/kernel/postinst.d/apt-auto-removal 3.18.2poodim /usr/src/linux-3.18.2/debian/linux-image-3.18.2poodim//boot/vmlinuz-3.18.2poodim
/etc/kernel/postinst.d/apt-auto-removal: 84: /etc/kernel/postinst.d/apt-auto-removal: cannot create /etc/apt/apt.conf.d//01autoremove-kernels.dpkg-new: Permission denied
run-parts: /etc/kernel/postinst.d/apt-auto-removal exited with return code 2
make[3]: *** [install] Error 1
make[2]: *** [install] Error 2
make[2]: Leaving directory `/usr/src/linux-3.18.2'
make[1]: *** [debian/stamp/install/linux-image-3.18.2poodim] Error 2
make[1]: Leaving directory `/usr/src/linux-3.18.2'
make: *** [kernel_image] Error 2
ビルドが終わると、拡張子 deb の Debian パッケージ ファイルが /usr/src に作られます。
$ ls -l /usr/src
total 128108
drwxrwxr-x 25 john john     4096 Jan 10 19:56 linux-3.18.2
-rw-rw-r--  1 john john 80941176 Jan  8 10:34 linux-3.18.2.tar.xz
drwxr-xr-x 24 root root     4096 Jan 10 16:39 linux-headers-3.13.0-32
drwxr-xr-x  7 root root     4096 Jan 10 16:39 linux-headers-3.13.0-32-generic
drwxr-xr-x 23 root root     4096 Jan 10 21:42 linux-headers-3.18.2-poodim
-rw-r--r--  1 root root  7020266 Jan 10 19:59 linux-headers-3.18.2-poodim_3.18.2-poodim-10.00.Custom_amd64.deb
-rw-r--r--  1 root root 43196770 Jan 10 19:55 linux-image-3.18.2-poodim_3.18.2-poodim-10.00.Custom_amd64.deb
この後、必要なファイルを Debuggee にコピーしますが、その前に、作ったカーネルで OS が無事に動くかどうかを確かめるため、Debugger マシン上にカーネルをインストールして再起動します。ちょっと緊張します。
$ sudo dpkg -i /usr/src/linux-image-3.18.2-poodim_3.18.2-poodim-10.00.Custom_amd64.deb
$ sudo dpkg -i /usr/src/linux-headers-3.18.2-poodim_3.18.2-poodim-10.00.Custom_amd64.deb
$ sudo shutdown -r now

(再起動中)

$ uname -a
Linux linux-dev 3.18.2-poodim #1 SMP Sat Jan 10 17:25:35 PST 2015 x86_64 x86_64 x86_64 GNU/Linux
ここから先は、以下のサイトを参考にしました。
Kgdb - eLinux.org
http://elinux.org/Kgdb
kgdbを用いたカーネルデバッグ環境の構築 - big-eyed-hamsterの日記
http://d.hatena.ne.jp/big-eyed-hamster/20090331/1238470673
以下のファイルを debuggee 上にコピーします。
- /boot/initrd.img-3.18.2-poodim - ブート時の初期 RAM ディスク
- /boot/System.map-3.18.2-poodim - カーネルのシンボル テーブル
- /boot/vmlinuz-3.18.2-poodim - カーネル本体
どうやってコピーしてもいいのですが、今回は Debugger となる linux-dev 上で以下の scp コマンドを実行しました。10.0.0.46 は Debuggee の IP アドレスです。とりあえずホーム ディレクトリにコピー。
$ scp /boot/initrd.img-3.18.2-poodim john@10.0.0.46:~
$ scp /boot/System.map-3.18.2-poodim john@10.0.0.46:~
$ scp /boot/vmlinuz-3.18.2-poodim john@10.0.0.46:~
次に debuggee となる linux-test にログインし、/boot ディレクトリへのコピーと、パーミッションの設定などを行います。
$ cd ~
$ sudo mv  *poodim /boot/
$ cd /boot
$ sudo chown root:root initrd.img-3.18.2-poodim System.map-3.18.2-poodim vmlinuz-3.18.2-poodim
$ sudo chmod 600 vmlinuz-3.18.2-poodim System.map-3.18.2-poodim
$ ls -la /boot
total 58051
drwxr-xr-x  4 root root     1024 Jan 10 22:00 .
drwxr-xr-x 22 root root     4096 Jan 10 16:32 ..
-rw-r--r--  1 root root  1162712 Jul 14 21:29 abi-3.13.0-32-generic
-rw-r--r--  1 root root   165611 Jul 14 21:29 config-3.13.0-32-generic
drwxr-xr-x  5 root root     1024 Jan 10 22:04 grub
-rw-r--r--  1 root root 20084102 Jan 10 16:36 initrd.img-3.13.0-32-generic
-rw-r--r--  1 root root 18521322 Jan 10 21:58 initrd.img-3.18.2-poodim
drwx------  2 root root    12288 Jan 10 16:31 lost+found
-rw-r--r--  1 root root   176500 Mar 12  2014 memtest86+.bin
-rw-r--r--  1 root root   178176 Mar 12  2014 memtest86+.elf
-rw-r--r--  1 root root   178680 Mar 12  2014 memtest86+_multiboot.bin
-rw-------  1 root root  3381262 Jul 14 21:29 System.map-3.13.0-32-generic
-rw-------  1 root root  3526496 Jan 10 21:59 System.map-3.18.2-poodim
-rw-------  1 root root  5798112 Jul 14 21:29 vmlinuz-3.13.0-32-generic
-rw-------  1 root root  6004160 Jan 10 21:59 vmlinuz-3.18.2-poodim
上記の方法でも、OS の起動は問題ありませんでしたが、/lib/modules へのディレクトリ作成など、必要なセットアップ作業が行われません。したがって、ビルド後に作成された 2 つの Debian パッケージごとコピーして、Debuggee 上でも同様に sudo dpkg -i コマンドによるインストールを行ったほうが安全だと思います。
ブート時に、コピーしたカーネルが読み込まれるようにするため、ブートローダーである grub の設定をします。設定ファイルは /etc/default/grub です。
GRUB_DEFAULT=0
#GRUB_HIDDEN_TIMEOUT=0
GRUB_HIDDEN_TIMEOUT_QUIET=false
GRUB_TIMEOUT=30
GRUB_DISTRIBUTOR=`lsb_release -i -s 2> /dev/null || echo Debian`
GRUB_CMDLINE_LINUX_DEFAULT="kgdbwait kgdboc=ttyS0,115200"
GRUB_CMDLINE_LINUX=""
設定ファイルを変更したら、変更を /boot/grub/grub.cfg に反映させます。コピーしたカーネルが認識されたことが分かります。そのまま再起動します。
$ sudo update-grub
[sudo] password for john:
Generating grub configuration file ...
Found linux image: /boot/vmlinuz-3.18.2-poodim
Found initrd image: /boot/initrd.img-3.18.2-poodim
Found linux image: /boot/vmlinuz-3.13.0-32-generic
Found initrd image: /boot/initrd.img-3.13.0-32-generic
Found memtest86+ image: /memtest86+.elf
Found memtest86+ image: /memtest86+.bin
done
john@linux-test:~$ sudo shutdown -r now
なお、上記の方法は現在のバージョンである GRUB 2 の方法です。昔の GRUB では、/boot/grub/menu.lst を編集してカーネルのブート パラメーターを変更していたようです。まだ多くの情報が menu.lst を変更する方法を紹介していますが、menu.lst は現在存在しないので注意してください。
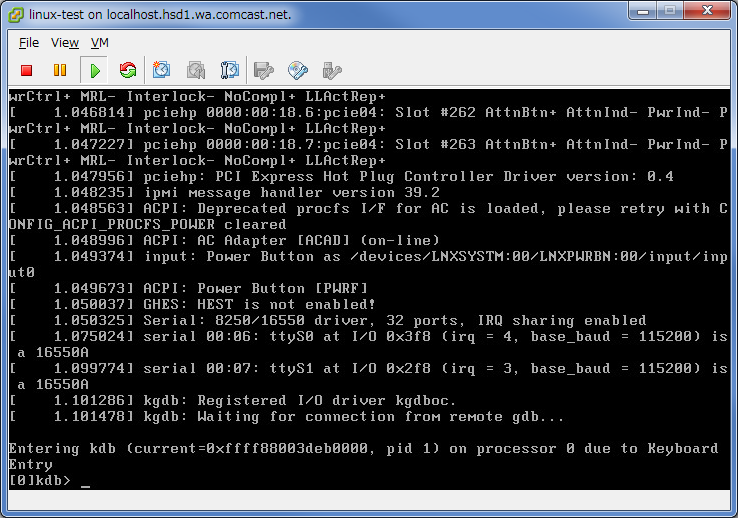
Debuggee である linux-test 再起動すると、コンソール上にはログインのプロンプトではなく、[0]kdb> というプロンプトが表れ、ローカルの kdb セッションが入力待ちになります。Debuggee はこのまま放置しておきます。
次に Debugger となる linux-dev のセッションに戻ります。linux-dev の COM1 ポート (/dev/ttyS0) から gdb を使って linux-test に繋ぎに行くわけですが、今使っている作業用ユーザーの john には /dev/ttyS0 にアクセスする権限がありません。sudo で gdb を起動してもいいのですが、sudo しなくてもいいよう権限を与えることにします。まず現在の設定を確認します。
john@linux-dev:~$ ls -la /dev/ttyS0
crw-rw---- 1 root dialout 4, 64 Jan 11 01:02 /dev/ttyS0
john を dialout に参加させればいいようです。設定を反映させるため、ログアウトしてから再ログインします。
$ sudo adduser john dialout
Adding user `john' to group `dialout' ...
Adding user john to group dialout
Done.
$ groups john
john : john adm dialout cdrom sudo dip plugdev lpadmin sambashare
$ logout
ようやく gdb を起動するところまできました。ここで重要なのは、ただ gdb を起動すればいいというわけではなく、linux-test 上でシンボルが正しく解決されるように、ビルドしたカーネル ファイルをターゲットにする必要があることです。今回の環境だと、/usr/src/linux-3.18.2/vmlinux がカーネルのバイナリです。
$ gdb /usr/src/linux-3.18.2/vmlinux
GNU gdb (Ubuntu 7.7.1-0ubuntu5~14.04.2) 7.7.1
Copyright (C) 2014 Free Software Foundation, Inc.
License GPLv3+: GNU GPL version 3 or later <http://gnu.org/licenses/gpl.html>
This is free software: you are free to change and redistribute it.
There is NO WARRANTY, to the extent permitted by law.  Type "show copying"
and "show warranty" for details.
This GDB was configured as "x86_64-linux-gnu".
Type "show configuration" for configuration details.
For bug reporting instructions, please see:
<http://www.gnu.org/software/gdb/bugs/>.
Find the GDB manual and other documentation resources online at:
<http://www.gnu.org/software/gdb/documentation/>.
For help, type "help".
Type "apropos word" to search for commands related to "word"...
Reading symbols from /usr/src/linux-3.18.2/vmlinux...done.
(gdb) set serial baud 115200
(gdb) target remote /dev/ttyS0
Remote debugging using /dev/ttyS0
kgdb_breakpoint () at kernel/debug/debug_core.c:1051
1051            wmb(); /* Sync point after breakpoint */
(gdb) bt
#0  kgdb_breakpoint () at kernel/debug/debug_core.c:1051
#1  0xffffffff811151f0 in kgdb_initial_breakpoint () at kernel/debug/debug_core.c:949
#2  kgdb_register_io_module (new_dbg_io_ops=0xffffffff81cb6d80 <kgdboc_io_ops>)
    at kernel/debug/debug_core.c:991
#3  0xffffffff8149c9ef in configure_kgdboc () at drivers/tty/serial/kgdboc.c:200
#4  0xffffffff81d8ff5a in init_kgdboc () at drivers/tty/serial/kgdboc.c:229
#5  0xffffffff8100212c in do_one_initcall (fn=0xffffffff81d8ff46 <init_kgdboc>) at init/main.c:791
#6  0xffffffff81d43245 in do_initcall_level (level=<optimized out>) at init/main.c:856
#7  do_initcalls () at init/main.c:864
#8  do_basic_setup () at init/main.c:883
#9  kernel_init_freeable () at init/main.c:1004
#10 0xffffffff8175539e in kernel_init (unused=<optimized out>) at init/main.c:934
#11 <signal handler called>
#12 0x0000000000000000 in irq_stack_union ()
#13 0x0000000000000000 in ?? ()
(gdb)
(ボーレートを指定する set serial baud 115200 は省略しても問題ないみたいです。)
コールスタックから、kgdb_initial_breakpoint() というそれっぽい関数で止まっているのが分かります。あとは、ユーザーモードの gdb と同じように操作できます。とりあえず c で実行を再開して、linux-test にログインします。
あとは普通にデバッグすればいいのですが、この後必要となる操作は、カーネル デバッガーにブレークインする方法です。Windows ならカーネル デバッガー上で Ctrl-C を押せば止まりますが、gdb で Ctrl-C を押しても止まってくれません。
方法は幾つかあり、以下のページに載っています。
Chapter 5. Using kgdb / gdb
https://www.kernel.org/doc/htmldocs/kgdb/EnableKGDB.html
使用頻度が高そうな 2 通りの方法について紹介します。
まずはキーボードを使う場合。goo ランキングで、「実はイマイチ使いどころがわからないWindowsのキー」 の第一位に輝いた SysRq キーを使います。もし SysRq キーが無ければ、PrintScreen ボタンを使います。
実はイマイチ使いどころがわからないWindowsのキー - gooランキング
http://ranking.goo.ne.jp/ranking/category/092/fR4cJvWG2ytj/
Windows では確か全く使われないはずですが、Linux では、マジック SysRq キーと呼ばれ、カーネルに特殊なコマンドを発行するために使います。デバッガーにブレークインするには、SysRq-g を使います。
Magic SysRq key - Wikipedia, the free encyclopedia
http://en.wikipedia.org/wiki/Magic_SysRq_key
ただし、Ubuntu Server のデフォルトでは、誤操作を防ぐためキーボードからの SysRq が無効にされており、まずはそれを有効にします。設定は簡単で、/etc/sysctl.conf ファイルに以下の一行を追加するだけです。
kernel.sysrq = 1
設定を有効にするには、sysctl -p コマンドを実行します。再起動は不要です。
john@linux-test:~$ sudo sysctl -p
kernel.sysrq = 1
キーの押し方は以下のような感じ。Alt+SysRq+G の同時押しでも動きます。
- Alt キーを押したままにする
- SysRq キーを押して放す (Alt キーは押したまま)
- g キーを押して放す(Alt キーは押したまま)
- Alt キーを放す
これは、シェルが起動していなくても有効です。例えば、ログインのプロンプトでブレークインさせるとこんな感じ。
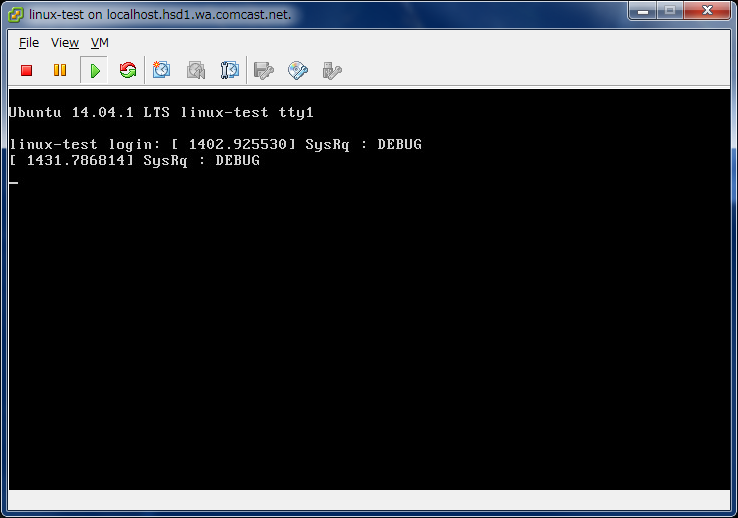
ログイン画面で Alt+SysRq+G
参考までに、このときのコールスタックはこんな感じ。sysrq_handle_dbg() という関数が呼ばれるみたいです。
(gdb) bt
#0  kgdb_breakpoint () at kernel/debug/debug_core.c:1051
#1  0xffffffff8111424c in sysrq_handle_dbg (key=<optimized out>) at kernel/debug/debug_core.c:810
#2  0xffffffff8147a867 in __handle_sysrq (key=103, check_mask=true) at drivers/tty/sysrq.c:536
#3  0xffffffff8147ac96 in sysrq_handle_keypress (value=<optimized out>, code=<optimized out>,
    sysrq=<optimized out>) at drivers/tty/sysrq.c:797
#4  sysrq_filter (handle=<optimized out>, type=<optimized out>, code=<optimized out>,
    value=<optimized out>) at drivers/tty/sysrq.c:859
#5  0xffffffff815bd579 in input_to_handler (handle=<optimized out>, vals=0xffff88003696b848,
    count=<optimized out>) at drivers/input/input.c:105
#6  0xffffffff815be8a9 in input_pass_values (dev=0xffff880036976800, vals=0xffff88003696b840,
    count=3) at drivers/input/input.c:147
#7  0xffffffff815c0b79 in input_pass_values (count=<optimized out>, vals=<optimized out>,
    dev=<optimized out>) at drivers/input/input.c:395
#8  input_handle_event (dev=0xffff880036976800, type=0, code=0, value=0)
    at drivers/input/input.c:396
#9  0xffffffff815c0ff9 in input_event (dev=0x67 <irq_stack_union+103>, type=<optimized out>,
    code=<optimized out>, value=<optimized out>) at drivers/input/input.c:431
#10 0xffffffff815c71cc in input_sync (dev=<optimized out>) at include/linux/input.h:414
#11 atkbd_interrupt (serio=0xffff880036975000, data=<optimized out>, flags=<optimized out>)
    at drivers/input/keyboard/atkbd.c:511
#12 0xffffffff815ba23a in serio_interrupt (serio=0xffff880036975000, data=34 '"', dfl=0)
    at drivers/input/serio/serio.c:1008
#13 0xffffffff815bb98a in i8042_interrupt (irq=<optimized out>, dev_id=<optimized out>)
    at drivers/input/serio/i8042.c:537
#14 0xffffffff810c4e1e in handle_irq_event_percpu (desc=<optimized out>,
    action=0x1 <irq_stack_union+1>) at kernel/irq/handle.c:143
#15 0xffffffff810c4fc1 in handle_irq_event (desc=0xffff88003f805600) at kernel/irq/handle.c:192
#16 0xffffffff810c7f0f in handle_edge_irq (irq=<optimized out>, desc=0xffff88003f805600)
    at kernel/irq/chip.c:605
#17 0xffffffff810155f2 in generic_handle_irq_desc (desc=<optimized out>, irq=<optimized out>)
    at include/linux/irqdesc.h:128
#18 handle_irq (irq=1, regs=<optimized out>) at arch/x86/kernel/irq_64.c:87
#19 0xffffffff8176eeb3 in do_IRQ (regs=0xffffffff81c03dc8 <init_thread_union+15816>)
    at arch/x86/kernel/irq.c:200
#20 <signal handler called>
#21 0xffffffffffffffce in ?? ()
Cannot access memory at address 0x246
残念ながらマジック SysRq キーを Teraterm 上で使うことはできません。リモート セッションからブレークさせる場合は、/proc/sysrq-trigger に対して g をエコーで送って SysRq-g を実現できます。しかし sysrq-trigger への書き込みは、sudo を使っても Permission denied で怒られてしまいます。
john@linux-test:~$ sudo echo g > /proc/sysrq-trigger
-bash: /proc/sysrq-trigger: Permission denied
john@linux-test:~$ ls -la /proc/sysrq-trigger
--w------- 1 root root 0 Jan 11 01:38 /proc/sysrq-trigger
sysrq-trigger を使うには、sudo ではなく本物の root ユーザーが必要です。Ubuntu Server の初期状態では、root ユーザーにパスワードが割り当てられていないので、パスワードを割り当ててスイッチ ユーザーしてからもう一度実行します。
john@linux-test:~$ sudo passwd root
[sudo] password for john:
Enter new UNIX password:
Retype new UNIX password:
passwd: password updated successfully
john@linux-test:~$ su -
Password:
root@linux-test:~# echo g > /proc/sysrq-trigger
今度はブレークしました。コールスタックの上のほうは、キーボードからブレークさせたときと同じになっています。もたもたしているとリモートセッションがタイムアウトで切れてしまうので、早めに c で実行を再開しておきましょう。
(gdb) bt
#0  kgdb_breakpoint () at kernel/debug/debug_core.c:1051
#1  0xffffffff8111424c in sysrq_handle_dbg (key=<optimized out>) at kernel/debug/debug_core.c:810
#2  0xffffffff8147a867 in __handle_sysrq (key=103, check_mask=false) at drivers/tty/sysrq.c:536
#3  0xffffffff8147ad13 in write_sysrq_trigger (file=<optimized out>, buf=<optimized out>, count=1,
    ppos=<optimized out>) at drivers/tty/sysrq.c:1092
#4  0xffffffff81241e8d in proc_reg_write (file=<optimized out>, buf=<optimized out>,
    count=<optimized out>, ppos=<optimized out>) at fs/proc/inode.c:224
#5  0xffffffff811dd067 in vfs_write (file=0x67 <irq_stack_union+103>,
    buf=0x1bd2408 "g\nload is /sbin/reload\nt\ne-kpkg\nub-script-check\nbkdf2\n", '\337' <repeats 145 times>, <incomplete sequence \337>..., count=<optimized out>, pos=0xffff88003cf13f50)
    at fs/read_write.c:534
#6  0xffffffff811ddae6 in SYSC_write (count=<optimized out>, buf=<optimized out>,
    fd=<optimized out>) at fs/read_write.c:585
#7  SyS_write (fd=<optimized out>, buf=29172744, count=2) at fs/read_write.c:577
#8  <signal handler called>
#9  0x00007f5362cc52f0 in ?? ()
c#10 0xffff88003cf14240 in ?? ()
#11 0x0000000000000000 in ?? ()
これで全ての準備が整ったので、あとは思う存分 Linux カーネルの海に漕ぎ出すだけです。最後に、何か適当なところにブレークポイントを貼って試してみることにしました。
Windows でいう CreateProcess 的な関数はどれかな、と探すと、arch/x86/kernel/process_64.c に start_thread() とかいう CreateThread っぽい関数を見つけたので、これで試すことにしました。ブレークポイントを設定してから、ifconfig などの適当なプロセスを実行します。
(gdb) i functions start_thread
All functions matching regular expression "start_thread":

File arch/x86/kernel/process_64.c:
void start_thread(struct pt_regs *, unsigned long, unsigned long);
void start_thread_ia32(struct pt_regs *, u32, u32);
static void start_thread_common(struct pt_regs *, unsigned long, unsigned long, unsigned int,
    unsigned int, unsigned int);

File drivers/usb/early/ehci-dbgp.c:
static int kgdbdbgp_start_thread(void);
(gdb) break start_thread
Breakpoint 1 at 0xffffffff81011460: file arch/x86/kernel/process_64.c, line 249.
(gdb) c
Continuing.
[New Thread 1445]
[Switching to Thread 1445]

Breakpoint 1, start_thread (regs=0xffff8800369cbf58, new_ip=140737391120576,
    new_sp=140737391120576) at arch/x86/kernel/process_64.c:249
249     {
(gdb) bt
#0  start_thread (regs=0xffff8800369cbf58, new_ip=140737391120576, new_sp=140737391120576)
    at arch/x86/kernel/process_64.c:249
#1  0xffffffff812321c5 in load_elf_binary (bprm=0xffff88003cd50400) at fs/binfmt_elf.c:975
#2  0xffffffff811e34b7 in search_binary_handler (bprm=0xffff8800369cbf58) at fs/exec.c:1374
#3  0xffffffff811e4901 in exec_binprm (bprm=<optimized out>) at fs/exec.c:1416
#4  do_execve_common (filename=0xffff88003c272000, argv=..., envp=...) at fs/exec.c:1513
#5  0xffffffff811e4cd9 in do_execve (__envp=<optimized out>, __argv=<optimized out>,
    filename=<optimized out>) at fs/exec.c:1555
#6  SYSC_execve (envp=<optimized out>, argv=<optimized out>, filename=<optimized out>)
    at fs/exec.c:1609
#7  SyS_execve (filename=<optimized out>, argv=32422696, envp=32196616) at fs/exec.c:1604
#8  0xffffffff8176c6c9 in stub_execve () at arch/x86/kernel/entry_64.S:648
#9  0x00007f196561cdb7 in ?? ()
Backtrace stopped: previous frame inner to this frame (corrupt stack?)

(gdb) p regs
$1 = (struct pt_regs *) 0xffff8800369cbf58
(gdb) p *regs
$2 = {r15 = 0, r14 = 0, r13 = 0, r12 = 0, bp = 0, bx = 0, r11 = 0, r10 = 0, r9 = 0, r8 = 0,
  ax = 0, cx = 0, dx = 0, si = 0, di = 0, orig_ax = 59, ip = 139747051818423, cs = 51,
  flags = 518, sp = 140733820489592, ss = 43}
普通に使えそう。というわけで、Linux カーネルとの距離を少し縮められた気がします。
デバッグ テクニックに関しては、Ubuntu のカーネル チームのサイトが充実していて、今後お世話になりそう。
Kernel/Debugging - Ubuntu Wiki
https://wiki.ubuntu.com/Kernel/Debugging