Apache Live-Debugging on Linux
数ヶ月前、初めて仕事で必要になって、オープンソースのソフトをちょこちょこっと改変してビルドして使うという機会がありました。Windows ばっかり使っているとだめですね。弄ったのは openssl のコードで、それを元に Apache の mod_ssl を動かしたのですが、そのときは Apache のデバッグ方法がよく分からず、勉強に費やす時間もなかったので printf を書きまくる力技で何とか目的の動作を実現させました。が、複雑なことをやろうとすると、デバッガーを繋いで変数を見たり、コールスタックを見たりする必要が出てきます。後日、その方法を一通り覚えたのでまとめておこうと思います。
自作のモジュールをデバッグするだけなら、apache 本体は apt-get したものを使えば一応事足ります。しかし多くの場合は apache 内部の変数や関数を見たくなる時もありそうなので、apache 本体のデバッグ情報も得るため、全部ソースからビルドしておきます。自分用のメモも兼ねてその手順から。
Linux 初心者としてけっこう困るのが、ディレクトリーの使い分け方。複数の流派があって、どこに何を置けばいいのか決められない。最近は統一しようという動きがあるみたいですが。プログラムをソースからビルドしてインストールする際、以下のブログに書かれているルールが明確でいい感じだったので、真似させてもらうことにしました。
Apache 2.4をソースからインストール - Starlight
http://d.hatena.ne.jp/Kazuhira/20121117/1353159552
/usr/local/[ソフトウェア名]/[ソフトウェア名-Version]
/usr/local/[ソフトウェア名]/current  # 現在使用中のバージョンへのシンボリックリンク
環境はこちら。Hyper-V 上の仮想マシンですが、だからといって特別なことはありません。
- Ubuntu Server 14.04 LTS x64
- Linux Kernel 3.13.0-24-generic
- gcc (Ubuntu 4.8.2-19ubuntu1) 4.8.2
- GNU gdb (Ubuntu 7.7.1-0ubuntu5~14.04.2) 7.7.1
gcc と gdb を apt-get するコマンドはこれ。
$ sudo apt-get install build-essential libtool manpages-dev gdb
将来使いそうなので、OpenSSL もビルドしておきます。依存関係を考慮すると、必要なモジュールは以下の通り。
| 名前 | URL | バージョン (2014/12 での最新) | 依存関係 |
| OpenSSL | http://www.openssl.org/source/ | 1.0.1j | なし |
| APR (=Apache Portal Runtime) | http://apr.apache.org/download.cgi | 1.5.1 | なし |
| APR-util | http://apr.apache.org/download.cgi | 1.5.4 | APR |
| PCRE (= Perl Compatible Regular Expressions) | http://pcre.org/ | 8.36 | なし |
| Apache | http://httpd.apache.org/download.cgi | 2.4.10 | APR APR-util PCRE OpenSSL |
ソースからビルドすると言っても、実はとても簡単で、configure で Makefile を作って、make でビルドして、sudo make install でインストールするだけです。どうやらこれを “configure-make-make install dance” というようです。configure を実行するところで、インストール ディレクトリや、コンパイル オプション、リンカ オプションなどをいろいろ指定できます。
冒頭で決めたルールに従って、実行したコマンドを載せておきます。なお、ソースは全部 /usr/src にダウンロードして、そのまま同じところに解凍しました。
まずは OpenSSL から。configure のときに -fPIC オプションをつけないと、Apache のビルドの時にエラーが出るので注意。
$ wget http://www.openssl.org/source/openssl-1.0.1j.tar.gz
$ tar -zxvf openssl-1.0.1j.tar.gz
$ cd openssl-1.0.1j/
$ ./config --prefix=/usr/local/openssl/openssl-1.0.1j -fPIC
$ make
$ sudo make install
$ sudo ln -s /usr/local/openssl/openssl-1.0.1j /usr/local/openssl/current
Ubuntu 12.04 には、もともと OpenSSL 1.0.1f が /usr/bin に入っているので、ビルドした 1.0.1j へのシンボリックリンクで置き換えておきます。
$ openssl version
OpenSSL 1.0.1f 6 Jan 2014

$ sudo mv /usr/bin/openssl /usr/bin/openssl-1.0.1f
$ sudo ln /usr/local/openssl/current/bin/openssl /usr/bin/openssl

john@glycine:/usr/src/openssl-1.0.1j$ openssl version
OpenSSL 1.0.1j 15 Oct 2014
次、APR。
$ wget http://apache.mesi.com.ar/apr/apr-1.5.1.tar.gz
$ tar -zxvf apr-1.5.1.tar.gz
$ cd apr-1.5.1/
$ ./configure --prefix=/usr/local/apr/apr-1.5.1
$ make
$ sudo make install
$ sudo ln -s /usr/local/apr/apr-1.5.1 /usr/local/apr/current
次は APR-util。APR のディレクトリを指定するときに、シンボリックリンクの current を使っています。
$ wget http://apache.claz.org/apr/apr-util-1.5.4.tar.gz
$ tar -zxvf apr-util-1.5.4.tar.gz
$ cd apr-util-1.5.4/
$ ./configure --prefix=/usr/local/apr-util/apr-util-1.5.4 \
> --with-apr=/usr/local/apr/current
$ make
$ sudo make install
$ sudo ln -s /usr/local/apr-util/apr-util-1.5.4 /usr/local/apr-util/current
次は PCRE。
$ wget ftp://ftp.csx.cam.ac.uk/pub/software/programming/pcre/pcre-8.36.tar.gz
$ tar -zxvf pcre-8.36.tar.gz
$ cd pcre-8.36/
$ ./configure --prefix=/usr/local/pcre/pcre-8.36
$ make
$ sudo make install
$ sudo ln -s /usr/local/pcre/pcre-8.36 /usr/local/pcre/current
ここまででハマるポイントはありませんでした。ではいよいよ Apache のビルドです。これまでに作ったモジュールのパスを全部指定します。また、mod_so、mod_ssl、mod_rewrite をデフォルトで有効にしておきます。何となくです。
$ wget http://apache.mesi.com.ar/httpd/httpd-2.4.10.tar.gz
$ tar -zxvf httpd-2.4.10.tar.gz
$ cd httpd-2.4.10/
$ ./configure --prefix=/usr/local/apache-httpd/httpd-2.4.10 \
> --with-apr=/usr/local/apr/current \
> --with-apr-util=/usr/local/apr-util/current \
> --with-pcre=/usr/local/pcre/current \
> --with-ssl=/usr/local/openssl/current \
> --enable-so \
> --enable-ssl \
> --enable-rewrite
$ make
$ sudo make install
$ sudo ln -s /usr/local/apache-httpd/httpd-2.4.10 /usr/local/apache-httpd/current

$ sudo /usr/local/apache-httpd/current/bin/apachectl -V
Server version: Apache/2.4.10 (Unix)
Server built:   Dec  3 2014 23:31:13
Server's Module Magic Number: 20120211:36
Server loaded:  APR 1.5.1, APR-UTIL 1.5.4
Compiled using: APR 1.5.1, APR-UTIL 1.5.4
Architecture:   64-bit
Server MPM:     event
  threaded:     yes (fixed thread count)
    forked:     yes (variable process count)
Server compiled with....
-D APR_HAS_SENDFILE
-D APR_HAS_MMAP
-D APR_HAVE_IPV6 (IPv4-mapped addresses enabled)
-D APR_USE_SYSVSEM_SERIALIZE
-D APR_USE_PTHREAD_SERIALIZE
-D SINGLE_LISTEN_UNSERIALIZED_ACCEPT
-D APR_HAS_OTHER_CHILD
-D AP_HAVE_RELIABLE_PIPED_LOGS
-D DYNAMIC_MODULE_LIMIT=256
-D HTTPD_ROOT="/usr/local/apache-httpd/httpd-2.4.10"
-D SUEXEC_BIN="/usr/local/apache-httpd/httpd-2.4.10/bin/suexec"
-D DEFAULT_PIDLOG="logs/httpd.pid"
-D DEFAULT_SCOREBOARD="logs/apache_runtime_status"
-D DEFAULT_ERRORLOG="logs/error_log"
-D AP_TYPES_CONFIG_FILE="conf/mime.types"
-D SERVER_CONFIG_FILE="conf/httpd.conf"
OpenSSL のところで触れましたが、OpenSSL は -fPIC オプションをつけてコンパイルしないといけません。PIC とは、Position Independent Code の略です。
Position-independent code - Wikipedia, the free encyclopedia
http://en.wikipedia.org/wiki/Position-independent_code
もし、PIC なしで OpenSSL をコンパイルすると、Apache のビルド時に以下のエラーが出ます。この場合、OpenSSL を make clean して configure から実行し直せば問題なしです。
/usr/bin/ld: /usr/local/openssl/current/lib/libssl.a(s3_srvr.o): relocation R_X86_64_32 against `.rodata' can not be used when making a shared object; recompile with -fPIC
/usr/local/openssl/current/lib/libssl.a: error adding symbols: Bad value
collect2: error: ld returned 1 exit status
無事に Apache がビルドできたら、念のため httpd.conf のバックアップを取り、とりあえず起動してみます。起動は bin に入っている apachectl というスクリプトを使うと楽です。実行可能ファイルの実体は httpd というファイルです。AH00558 という警告は、httpd.conf の ServerName オプションに適当な名前を指定すれば発生しなくなります。
john@glycine:~$ sudo /usr/local/apache-httpd/current/bin/apachectl start
AH00558: httpd: Could not reliably determine the server's fully qualified domain name, using 127.0.1.1. Set the 'ServerName' directive globally to suppress this message
john@glycine:~$ ps -ef | grep
Usage: grep [OPTION]... PATTERN [FILE]...
Try 'grep --help' for more information.
john@glycine:~$ ps -ef | grep apache
root      1195     1  0 22:16 ?        00:00:00 /usr/sbin/apache2 -k start
www-data  1198  1195  0 22:16 ?        00:00:01 /usr/sbin/apache2 -k start
www-data  1199  1195  0 22:16 ?        00:00:01 /usr/sbin/apache2 -k start
root     10953     1  0 23:43 ?        00:00:00 /usr/local/apache-httpd/httpd-2.4.10/bin/httpd -k start
daemon   10954 10953  0 23:43 ?        00:00:00 /usr/local/apache-httpd/httpd-2.4.10/bin/httpd -k start
daemon   10955 10953  0 23:43 ?        00:00:00 /usr/local/apache-httpd/httpd-2.4.10/bin/httpd -k start
daemon   10956 10953  0 23:43 ?        00:00:00 /usr/local/apache-httpd/httpd-2.4.10/bin/httpd -k start
john     11041  1431  0 23:43 pts/1    00:00:00 grep --color=auto apache
john@glycine:~$
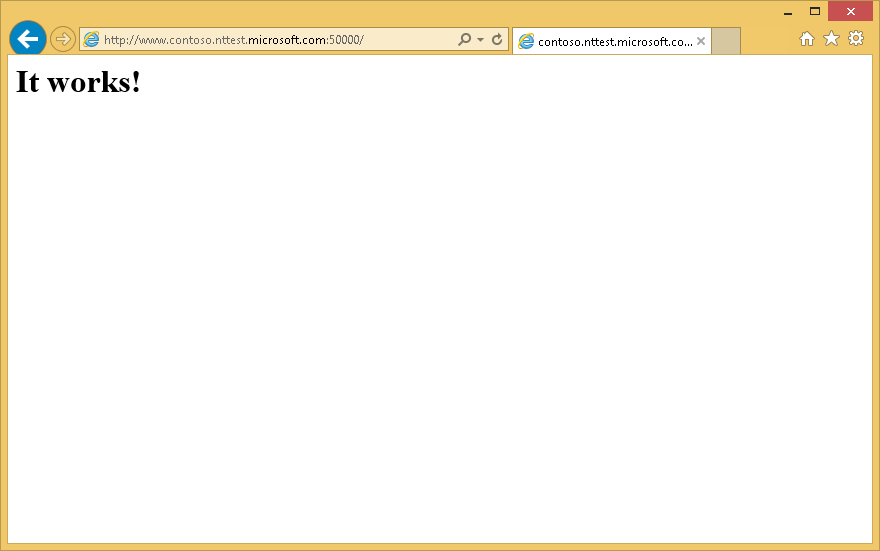
ブラウザで見ると、”It works!” というテキストのみのページが表示されます。これは htdocs にある index.html です。
これで Apache が起動できるようになりました。次に、モジュールをデバッグする手順です。どのモジュールでもいいのですが、後でやろうとしていることの都合上、ここではフィルターの一つであるmod_sed モジュールをデバッグします。なぜかヘルプのページが Apache 2.5 になっている・・。
mod_sed - Apache HTTP Server Version 2.5
http://httpd.apache.org/docs/trunk/mod/mod_sed.html
httpd.conf に mod_sed の設定を追加します。まず、元のファイルに以下の行がコメントアウトされているはずなので、行の先頭の # を消します。
LoadModule sed_module modules/mod_sed.so
次に、適当な Directory セクションを追加するなり、元からあるものを選ぶなりして、以下の 2 行 (青字) を追加します。
<Directory "/usr/local/apache-httpd/httpd-2.4.10/htdocs">
(snip)

    #
    # Controls who can get stuff from this server.
    #
    Require all granted

    AddOutputFilter Sed html
    OutputSed "s/HERE/Hello/g"

</Directory>
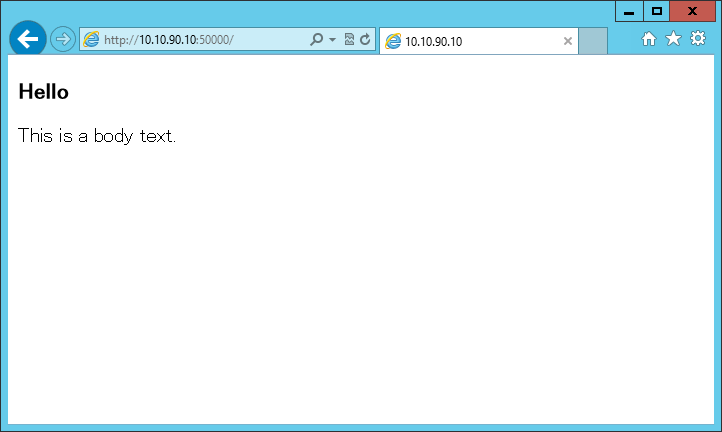
最後に、htdocs/index.html を適当に書き換えます。
<!DOCTYPE html>
<html>
<head>
</head>
<body>
<h3>HERE</h3>
<p>This is a body text.</p>
</body>
</html>
mod_sed が正常に動作するかどうかを確認するため、httpd を再起動してブラウザーで開きます。
john@glycine:~$ sudo /usr/local/apache-httpd/current/bin/apachectl -k stop
john@glycine:~$ sudo /usr/local/apache-httpd/current/bin/apachectl -k start
john@glycine:~$ ps -ef | grep apache
john      2357  1490  0 23:37 pts/1    00:00:00 vi /usr/local/apache-httpd/current/conf/httpd.conf
root      2491     1  0 23:43 ?        00:00:00 /usr/local/apache-httpd/httpd-2.4.10/bin/httpd -k start
daemon    2492  2491  0 23:43 ?        00:00:00 /usr/local/apache-httpd/httpd-2.4.10/bin/httpd -k start
daemon    2493  2491  0 23:43 ?        00:00:00 /usr/local/apache-httpd/httpd-2.4.10/bin/httpd -k start
daemon    2494  2491  0 23:43 ?        00:00:00 /usr/local/apache-httpd/httpd-2.4.10/bin/httpd -k start
john      2577  1406  0 23:43 pts/0    00:00:00 grep --color=auto apache
john@glycine:~$
見出しの HERE が mod_sed によって Hello に置換されているのが分かります。
さて、いよいよ httpd に gdb をアタッチするわけですが、上記 ps -ef コマンドを見る限り、httpd のプロセスが複数起動されています。詳しくは知りませんが、並列処理のためにプロセスをフォークして複数プロセスで要求を処理するのでしょう。これだと、要求が来たときにどのプロセスで処理されるのかが分からないので、不可能ではありませんが、デバッグが面倒くさくなりそうです。Apache には、デバッグ用のためのシングル プロセス モードが用意されているのでそれを使います。httpd の実行時に -X オプションをつければデバッグ モードになります。
Apache を gdb でデバッグするときの公式のガイドが ↓ にあります。
Apache HTTPD Debugging Guide - The Apache HTTP Server Project
http://httpd.apache.org/dev/debugging.html
では実際にやってみます。
john@glycine:~$ sudo gdb /usr/local/apache-httpd/current/bin/httpd
GNU gdb (Ubuntu 7.7.1-0ubuntu5~14.04.2) 7.7.1
Copyright (C) 2014 Free Software Foundation, Inc.
License GPLv3+: GNU GPL version 3 or later <http://gnu.org/licenses/gpl.html>
This is free software: you are free to change and redistribute it.
There is NO WARRANTY, to the extent permitted by law.  Type "show copying"
and "show warranty" for details.
This GDB was configured as "x86_64-linux-gnu".
Type "show configuration" for configuration details.
For bug reporting instructions, please see:
<http://www.gnu.org/software/gdb/bugs/>.
Find the GDB manual and other documentation resources online at:
<http://www.gnu.org/software/gdb/documentation/>.
For help, type "help".
Type "apropos word" to search for commands related to "word"...
Reading symbols from /usr/local/apache-httpd/current/bin/httpd...done.
(gdb) r -X
Starting program: /usr/local/apache-httpd/httpd-2.4.10/bin/httpd -X
[Thread debugging using libthread_db enabled]
Using host libthread_db library "/lib/x86_64-linux-gnu/libthread_db.so.1".
[New Thread 0x7ffff3676700 (LWP 2776)]
[New Thread 0x7ffff2e75700 (LWP 2777)]
[New Thread 0x7ffff2674700 (LWP 2778)]
[New Thread 0x7ffff1e73700 (LWP 2779)]
[New Thread 0x7ffff1672700 (LWP 2780)]
[New Thread 0x7ffff0e71700 (LWP 2781)]
[New Thread 0x7fffebfff700 (LWP 2782)]
[New Thread 0x7fffeb7fe700 (LWP 2783)]
[New Thread 0x7fffeaffd700 (LWP 2784)]
[New Thread 0x7fffea7fc700 (LWP 2785)]
[New Thread 0x7fffe9ffb700 (LWP 2786)]
[New Thread 0x7fffe97fa700 (LWP 2787)]
[New Thread 0x7fffe8ff9700 (LWP 2788)]
[New Thread 0x7fffe87f8700 (LWP 2789)]
[New Thread 0x7fffe7ff7700 (LWP 2790)]
[New Thread 0x7fffe77f6700 (LWP 2791)]
[New Thread 0x7fffe6ff5700 (LWP 2792)]
[New Thread 0x7fffe67f4700 (LWP 2793)]
[New Thread 0x7fffe5ff3700 (LWP 2794)]
[New Thread 0x7fffe57f2700 (LWP 2795)]
[New Thread 0x7fffe4ff1700 (LWP 2796)]
[New Thread 0x7fffe47f0700 (LWP 2797)]
[New Thread 0x7fffe3fef700 (LWP 2798)]
[New Thread 0x7fffe37ee700 (LWP 2799)]
[New Thread 0x7fffe2fed700 (LWP 2800)]
[New Thread 0x7fffe27ec700 (LWP 2801)]
[New Thread 0x7fffe1feb700 (LWP 2802)]
[Thread 0x7ffff3676700 (LWP 2776) exited]
スレッドが大量に作られました。別のコンソール セッションからプロセスを確認すると、確かに httpd のインスタンスは 1 つだけです。
john@glycine:~$ ps -ef | grep httpd
root      2769  1406  0 23:58 pts/0    00:00:00 sudo gdb /usr/local/apache-httpd/current/bin/httpd
root      2770  2769  0 23:58 pts/0    00:00:00 gdb /usr/local/apache-httpd/current/bin/httpd
daemon    2772  2770  0 23:58 pts/0    00:00:00 /usr/local/apache-httpd/httpd-2.4.10/bin/httpd -X
john      2805  1490  0 23:59 pts/1    00:00:00 grep --color=auto httpd
ブラウザーからページを開けるので、サーバーとして問題はなさそうです。さて、ここからやりたいことは当然、ブレークさせてブレークポイントを設定することです。が、ここからの手順が若干トリッキー、というかあまり情報がありませんでした。
普通は、デバッガー上でキーボードから Ctrl-C なり Ctrl-Break を押してブレークさせます。実際にやるとこうなります。sed_response_filter は mod_sed 内の関数です。
^C <<<< デバッガー上で Ctrl-C
[Thread 0x7fffe37ee700 (LWP 2799) exited]
[Thread 0x7fffe2fed700 (LWP 2800) exited]

Program received signal SIGHUP, Hangup.
[Switching to Thread 0x7fffe1feb700 (LWP 2802)]
0x00007ffff727b653 in epoll_wait () at ../sysdeps/unix/syscall-template.S:81
81      ../sysdeps/unix/syscall-template.S: No such file or directory.
(gdb) i functions sed_response_filter
All functions matching regular expression "sed_response_filter":

File mod_sed.c:
static apr_status_t sed_response_filter(ap_filter_t *, apr_bucket_brigade *);
(gdb) break sed_response_filter
Breakpoint 1 at 0x7ffff54ec0a0: file mod_sed.c, line 269.
(gdb) c
Continuing.
[Thread 0x7ffff2674700 (LWP 2778) exited]
[Thread 0x7fffe1feb700 (LWP 2802) exited]
[Thread 0x7fffe4ff1700 (LWP 2796) exited]
[Thread 0x7fffe27ec700 (LWP 2801) exited]
[Thread 0x7fffe7ff7700 (LWP 2790) exited]
[Thread 0x7fffe3fef700 (LWP 2798) exited]
[Thread 0x7ffff0e71700 (LWP 2781) exited]
[Thread 0x7fffe47f0700 (LWP 2797) exited]
[Thread 0x7fffe9ffb700 (LWP 2786) exited]
[Thread 0x7fffe57f2700 (LWP 2795) exited]
[Thread 0x7fffe97fa700 (LWP 2787) exited]
[Thread 0x7fffe5ff3700 (LWP 2794) exited]
[Thread 0x7fffe6ff5700 (LWP 2792) exited]
[Thread 0x7fffe67f4700 (LWP 2793) exited]
[Thread 0x7ffff1672700 (LWP 2780) exited]
[Thread 0x7fffe77f6700 (LWP 2791) exited]
[Thread 0x7ffff2e75700 (LWP 2777) exited]
[Thread 0x7fffe87f8700 (LWP 2789) exited]
[Thread 0x7ffff1e73700 (LWP 2779) exited]
[Thread 0x7fffe8ff9700 (LWP 2788) exited]
[Thread 0x7fffeb7fe700 (LWP 2783) exited]
[Thread 0x7fffea7fc700 (LWP 2785) exited]
[Thread 0x7fffebfff700 (LWP 2782) exited]
[Thread 0x7fffeaffd700 (LWP 2784) exited]
[Inferior 1 (process 2772) exited normally]
(gdb) c
The program is not being run.
(gdb)
ブレークポイントは問題なくセットできましたが、continue した瞬間にスレッドが全部死にました。というか Ctrl-C のときに既にスレッド 2799 と 2800 が死んでいて、たぶんこれが原因です。この後、continue は不可能になってしまいました。run -X をもう一度実行して新たにプロセスを開始すればブレークポイントもそのまま有効になりますが、ブレークさせるたびにプロセスが死んでいてはデバッグになりません。
Linux に詳しくないので間違っているかもしれませんが、Ctrl-C を押すと SIGINT シグナルが送られて、Apache には独自のハンドラーがあって、ワーカー スレッドが SIGINT を処理するとスレッドが終了してしまうようになっているのかもしれません。(全くの勘です。ご指摘があれば嬉しいです。自分で調べろよって話ですが。)
(2015/1/2 追記)Ctrl+C でスレッドが死ぬ現象は、Apache がマルチスレッド モードでビルドされている場合のため、Apache をビルドするときにマルチスレッドではないモデルを選んでおけば、ソースからビルドした Apache でも Ctrl+C によってブレークさせることができます。具体的には、Apache の configure を実行するときに "--with-mpm=prefork" オプションを追加してください。
Multi-Processing Modules (MPMs) - Apache HTTP Server Version 2.4
http://httpd.apache.org/docs/2.4/mpm.html
prefork - Apache HTTP Server Version 2.4
http://httpd.apache.org/docs/2.4/mod/prefork.html
マルチスレッド モデルのときの解決策ですが、SIGINT ではなく、SIGTRAP を kill コマンドで送信するという手がありました。
john@glycine:~$ ps -ef | grep httpd
root      2824  1406  0 00:13 pts/0    00:00:00 sudo gdb /usr/local/apache-httpd/current/bin/httpd
root      2825  2824  6 00:13 pts/0    00:00:00 gdb /usr/local/apache-httpd/current/bin/httpd
daemon    2827  2825  0 00:13 pts/0    00:00:00 /usr/local/apache-httpd/httpd-2.4.10/bin/httpd -X
john      2861  1490  0 00:13 pts/1    00:00:00 grep --color=auto httpd
john@glycine:~$ sudo kill -SIGTRAP 2827
[sudo] password for john:
no talloc stackframe at ../source3/param/loadparm.c:4864, leaking memory
kill コマンドを実行すると、デバッガーにブレークインしてくれるので、先ほどと同じように sed_response_filter にブレークポイントを設定し、 conitnue します。今度はスレッドが死なないはずです。sed_response_filter は、名前の通り HTTP レスポンスを返す時に呼ばれるので、ブラウザーでページを開くだけでブレークします。以下は、コールスタックや引数の f を表示させている例です。
[New Thread 0x7fffe3fef700 (LWP 2853)]
[New Thread 0x7fffe37ee700 (LWP 2854)]
[New Thread 0x7fffe2fed700 (LWP 2855)]
[New Thread 0x7fffe27ec700 (LWP 2856)]
[New Thread 0x7fffe1feb700 (LWP 2857)]
[Thread 0x7ffff3676700 (LWP 2831) exited]

Program received signal SIGTRAP, Trace/breakpoint trap.<<<< kill コマンドによる SIGTRAP
0x00007ffff75560d1 in do_sigwait (sig=0x7fffffffe2ac, set=<optimized out>)
    at ../nptl/sysdeps/unix/sysv/linux/../../../../../sysdeps/unix/sysv/linux/sigwait.c:60
60      ../nptl/sysdeps/unix/sysv/linux/../../../../../sysdeps/unix/sysv/linux/sigwait.c: No such file or directory.
(gdb) break sed_response_filter
Breakpoint 1 at 0x7ffff54ec0a0: file mod_sed.c, line 269.
(gdb) c
Continuing.
[Switching to Thread 0x7fffe27ec700 (LWP 2856)]

Breakpoint 1, sed_response_filter (f=0x7fffdc007c50, bb=0x7fffdc008e18) at mod_sed.c:269
269     {
(gdb) bt
#0  sed_response_filter (f=0x7fffdc007c50, bb=0x7fffdc008e18) at mod_sed.c:269
#1  0x0000000000439f07 in default_handler (r=0x7fffdc002970) at core.c:4369
#2  0x000000000044a260 in ap_run_handler (r=0x7fffdc002970) at config.c:169
#3  0x000000000044a7a9 in ap_invoke_handler (r=r@entry=0x7fffdc002970) at config.c:433
#4  0x000000000045dd5a in ap_process_async_request (r=r@entry=0x7fffdc002970) at http_request.c:317
#5  0x000000000045ad70 in ap_process_http_async_connection (c=0x7fffec0372a0) at http_core.c:143
#6  ap_process_http_connection (c=0x7fffec0372a0) at http_core.c:228
#7  0x0000000000453580 in ap_run_process_connection (c=0x7fffec0372a0) at connection.c:41
#8  0x0000000000465d94 in process_socket (my_thread_num=24, my_child_num=0, cs=0x7fffec037218, sock=<optimized out>,
    p=<optimized out>, thd=<optimized out>) at event.c:1035
#9  worker_thread (thd=<optimized out>, dummy=<optimized out>) at event.c:1875
#10 0x00007ffff754e182 in start_thread (arg=0x7fffe27ec700) at pthread_create.c:312
#11 0x00007ffff727afbd in clone () at ../sysdeps/unix/sysv/linux/x86_64/clone.S:111
(gdb) p *f->r
$8 = {pool = 0x7fffdc0028f8, connection = 0x7fffec0372a0, server = 0x6c4618, next = 0x0, prev = 0x0, main = 0x0,
  the_request = 0x7fffdc003b58 "GET /?q=aaa HTTP/1.1", assbackwards = 0, proxyreq = 0, header_only = 0,
  proto_num = 1001, protocol = 0x7fffdc003b98 "HTTP/1.1", hostname = 0x7fffdc003d88 "10.10.90.10",
  request_time = 1419322660195931, status_line = 0x0, status = 304, method_number = 0, method = 0x7fffdc003b70 "GET",
  allowed = 0, allowed_xmethods = 0x0, allowed_methods = 0x7fffdc002c28, sent_bodyct = 0, bytes_sent = 0,
  mtime = 1419313062006926, range = 0x0, clength = 104, chunked = 0, read_body = 0, read_chunked = 0,
  expecting_100 = 0, kept_body = 0x0, body_table = 0x0, remaining = 0, read_length = 0, headers_in = 0x7fffdc002c68,
  headers_out = 0x7fffdc004650, err_headers_out = 0x7fffdc004778, subprocess_env = 0x7fffdc008928,
  notes = 0x7fffdc004528, content_type = 0x6f23e0 "text/html", handler = 0x6f23e0 "text/html", content_encoding = 0x0,
  content_languages = 0x0, vlist_validator = 0x0, user = 0x0, ap_auth_type = 0x0,
  unparsed_uri = 0x7fffdc003b80 "/?q=aaa", uri = 0x7fffdc0079f8 "/index.html",
  filename = 0x7fffdc007a50 "/usr/local/apache-httpd/httpd-2.4.10/htdocs/index.html",
  canonical_filename = 0x7fffdc007a10 "/usr/local/apache-httpd/httpd-2.4.10/htdocs/index.html", path_info = 0x0,
  args = 0x7fffdc007a08 "q=aaa", used_path_info = 2, eos_sent = 1, per_dir_config = 0x7fffdc004108,
  request_config = 0x7fffdc0038f0, log = 0x6c4638, log_id = 0x0, htaccess = 0x0, output_filters = 0x7fffdc007c50,
  input_filters = 0x7fffdc003da8, proto_output_filters = 0x7fffdc003a58, proto_input_filters = 0x7fffdc003da8,
  no_cache = 0, no_local_copy = 0, invoke_mtx = 0x7fffdc003dd0, parsed_uri = {scheme = 0x0, hostinfo = 0x0,
    user = 0x0, password = 0x0, hostname = 0x0, port_str = 0x7fffdc003da0 "50000", path = 0x7fffdc003b88 "/",
    query = 0x7fffdc003b90 "q=aaa", fragment = 0x0, hostent = 0x0, port = 50000, is_initialized = 1,
    dns_looked_up = 0, dns_resolved = 0}, finfo = {pool = 0x7fffdc006918, valid = 7598960, protection = 1604,
    filetype = APR_REG, user = 1000, group = 1000, inode = 2768083, device = 2049, nlink = 1, size = 104,
    csize = 4096, atime = 1419313378554926, mtime = 1419313062006926, ctime = 1419313062086926,
    fname = 0x7fffdc007a50 "/usr/local/apache-httpd/httpd-2.4.10/htdocs/index.html", name = 0x0, filehand = 0x0},
  useragent_addr = 0x7fffec037120, useragent_ip = 0x7fffec037600 "10.10.1.252"}
これで Linux 上のサービス (Linux 的にはデーモンか) のデバッグも余裕・・・!
事前に httpd の PID を取得しなくても、killall という素敵なコマンドがありました。これで一発。
$ sudo killall -SIGTRAP httpd