[Windows] OpenSSL on Windows and PowerShell Script Signing
年明けなので、軽い話題を。
EFS や IIS などの PKI 関連の検証を行なうときは、自己署名証明書を使うのが簡単です。しかし、自己署名を使う方法と、認証局に署名してもらう方法とでは微妙に異なっていることが多いので、OpenSSL で認証局を作って、そこで署名するようにしています。Windows 的には、Active Directory 証明書サービス (ADCS) を使うのが王道かもしれませんが、ADCS だと自動化され過ぎて面白くないのと、ADCS は規模が大きいので 「鶏を割くに牛刀を用い」 ているような気がして結局 OpenSSL です。Windows SDK に入っている makecert.exe を使った方が実は楽なのですが、Windows 以外でも使えるオープンな OpenSSL を覚えておいた方が後で幸せになれそうです。
MakeCert (Windows)
http://msdn.microsoft.com/en-us/library/aa386968(v=VS.85).aspx
そんなわけで、OpenSSL で認証局を作って証明書要求に署名するところまでをご紹介。環境はこれです。
- OS: Windows 8 (x64)
- OpenSSL 1.0.1c 10 May 2012 (64bit)
- ActivePerl v5.14.2 built for MSWin32-x64-multi-thread
ダウンロード ページは↓です。
ActivePerl Downloads - Perl Binaries for Windows, Linux and Mac
http://www.activestate.com/activeperl/downloads
Shining Light Productions - Win32 OpenSSL
http://slproweb.com/products/Win32OpenSSL.html
→ “Win64 OpenSSL v1.0.1c” あたりをダウンロード。
ダウンロードが終わったら、両方の bin フォルダーにパスを通しておきましょう。私の環境では、バイナリ―が入っているフォルダーは以下の 2 つです。
- C:\Perl64\bin
- C:\OpenSSL-Win64\bin
とりあえずバージョンを表示させてみて、ごちゃごちゃ表示されれば OK です。
E:\MSWORK> perl -v

This is perl 5, version 14, subversion 2 (v5.14.2) built for MSWin32-x64-multi-thread
(with 1 registered patch, see perl -V for more detail)

Copyright 1987-2011, Larry Wall

Binary build 1402 [295342] provided by ActiveState http://www.ActiveState.com
Built Oct  7 2011 15:19:36

Perl may be copied only under the terms of either the Artistic License or the
GNU General Public License, which may be found in the Perl 5 source kit.

Complete documentation for Perl, including FAQ lists, should be found on
this system using "man perl" or "perldoc perl".  If you have access to the
Internet, point your browser at http://www.perl.org/, the Perl Home Page.


E:\MSWORK> openssl version
OpenSSL 1.0.1c 10 May 2012
1. 認証局を立てる
認証局関連の作業用フォルダーを作ります。どこでもいいです。ここでは C:\Openssl-Win64\work を使います。
C:\OpenSSL-Win64> md work

C:\OpenSSL-Win64> cd work

C:\OpenSSL-Win64\work>
CA.pl と openssl.cfg ファイルを bin フォルダーからコピーします。
C:\OpenSSL-Win64\work> copy ..\bin\CA.pl .\
        1 file(s) copied.

C:\OpenSSL-Win64\work> copy ..\bin\openssl.cfg .\
        1 file(s) copied.
CA.pl を開いて、以下の一行を変更します。先ほどコピーした openssl.cfg を読むように指定します。CA.pl をそのままにして環境変数 SSLEAY_CONFIG を使ってもいいのですが、環境変数を増やしたくないので・・・。
#$SSLEAY_CONFIG=$ENV{"SSLEAY_CONFIG"};
$SSLEAY_CONFIG="-config C:\\OpenSSL-Win64\\work\\openssl.cfg";
openssl.cfg も変更します。
まず policy_match セクション。”match” の部分を全て optional にしておきます。
[ policy_match ]
#countryName         = match
#stateOrProvinceName = match
#organizationName    = match
countryName          = optional
stateOrProvinceName  = optional
organizationName     = optional
次に req_distinguished_name セクション。Organization Name と Common Name 以外は全てコメント アウトします。
[ req_distinguished_name ]
#countryName         = Country Name (2 letter code)
#countryName_default = AU
#countryName_min     = 2
#countryName_max     = 2

#stateOrProvinceName         = State or Province Name (full name)
#stateOrProvinceName_default = Some-State

#localityName = Locality Name (eg, city)

0.organizationName         = Organization Name (eg, company)
0.organizationName_default = Internet Widgits Pty Ltd

# we can do this but it is not needed normally :-)
#1.organizationName         = Second Organization Name (eg, company)
#1.organizationName_default = World Wide Web Pty Ltd

#organizationalUnitName         = Organizational Unit Name (eg, section)
#organizationalUnitName_default =

commonName     = Common Name (e.g. server FQDN or YOUR name)
commonName_max = 64

#emailAddress     = Email Address
#emailAddress_max = 64

# SET-ex3 = SET extension number 3
準備が整いました。書き上げてから気づきましたが、CA で使う鍵の長さも 2048bit にしたほうがよいかもしれません。
時すでに遅し、ということで CA.pl を使って証明機関を作成します。簡単です。
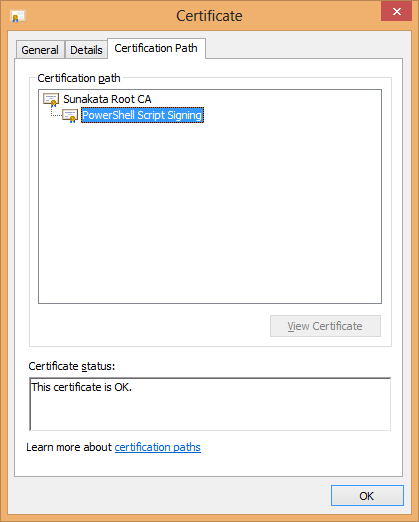
CA の名前や組織名には好きな名前を付けて下さい。以下の例では Sunakata と Sunakata Root CA です。
C:\OpenSSL-Win64\work> perl CA.pl -newca
CA certificate filename (or enter to create)
(Enter を押す)
Making CA certificate ...
Loading 'screen' into random state - done
Generating a 1024 bit RSA private key
.++++++
.....................++++++
writing new private key to './demoCA/private/cakey.pem'
Enter PEM pass phrase: (CA の秘密鍵へのアクセス パスワードを設定)
Verifying - Enter PEM pass phrase: (パスワード確認)
-----
You are about to be asked to enter information that will be incorporated
into your certificate request.
What you are about to enter is what is called a Distinguished Name or a DN.
There are quite a few fields but you can leave some blank
For some fields there will be a default value,
If you enter '.', the field will be left blank.
-----
Organization Name (eg, company) [Internet Widgits Pty Ltd]: Sunakata
Common Name (e.g. server FQDN or YOUR name) []: Sunakata Root CA
Please enter the following 'extra' attributes
to be sent with your certificate request
A challenge password []: (Enter を押す)
An optional company name []: (Enter を押す)
Using configuration from C:\OpenSSL-Win64\work\openssl.cfg
Loading 'screen' into random state - done
Enter pass phrase for ./demoCA/private/cakey.pem: (CA 秘密鍵のパスワード)
Check that the request matches the signature
Signature ok
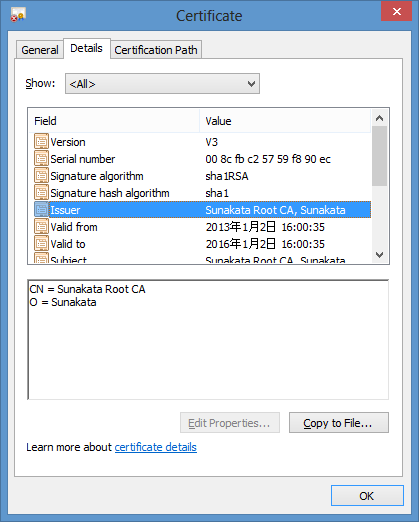
Certificate Details:
Serial Number:
8c:fb:c2:57:59:f8:90:ec
Validity
Not Before: Jan 2 07:00:35 2013 GMT
Not After : Jan 2 07:00:35 2016 GMT
Subject:
organizationName = Sunakata
commonName = Sunakata Root CA
X509v3 extensions:
X509v3 Subject Key Identifier:
20:2E:79:06:73:C2:8A:BB:52:32:90:1F:E8:66:87:5B:18:E0:8F:97
X509v3 Authority Key Identifier:
keyid:20:2E:79:06:73:C2:8A:BB:52:32:90:1F:E8:66:87:5B:18:E0:8F:97
X509v3 Basic Constraints:
CA:TRUE
Certificate is to be certified until Jan 2 07:00:35 2016 GMT (1095 days)
Write out database with 1 new entries
Data Base Updated
C:\OpenSSL-Win64\work>
CA ができました。
CA.pl に定義されている名前で、勝手にフォルダー階層やファイルができます。
C:\OpenSSL-Win64\work> tree .
C:\OPENSSL-WIN64\WORK
└─demoCA
    ├─certs
    ├─crl
    ├─newcerts
    └─private
主要なファイルは以下の 2 つです。
- ルート証明書: demoCA\cacert.pem
- 秘密鍵: demoCA\private\cakey.pem
その他のファイルは、CA が発行した証明書を管理するデータベースなどのファイルです。証明書の失効や CRL の生成で使います。
拡張子が pem になっていますが、ルート証明書の cacert.pem は Windows でいうところの拡張子 cer と同じ X.509 証明書なので、以下のコマンドで開くことができます。もちろん、拡張子を cer に変えたり、関連付けを作成しても構いません。
> rundll32 cryptext.dll,CryptExtOpenCER demoCA\cacert.pem
お馴染みの、以下のダイアログが開きます。
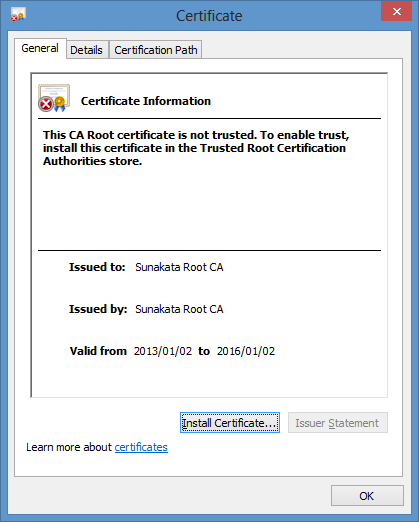
ルート証明書は、検証環境の [信頼されたルート証明機関] の証明書ストアに入れておきましょう。
2. 証明書要求を作って署名する
証明書要求は何でもいいのですが、多少は現代風の技術を取り入れるという趣旨のもと、PowerShell スクリプト (拡張子 ps1) にデジタル署名を追加するための証明書で試してみます。PowerShell なんて知らん、では済まない時代になってきました。嫌がらずに使って慣れていきましょう。
適当な環境で、スクリプトの実行ポリシーを AllSigned にします。これも Windows 8 の環境ですが Windows 7 でも変わらないはずです。
PS E:\mswork> Set-ExecutionPolicy AllSigned

Execution Policy Change
The execution policy helps protect you from scripts that you do not trust. Changing the execution
policy might expose you to the security risks described in the about_Execution_Policies help topic
at http://go.microsoft.com/fwlink/?LinkID=135170. Do you want to change the execution policy?
[Y] Yes  [N] No  [S] Suspend  [?] Help (default is "Y"): y

PS E:\mswork> Get-ExecutionPolicy
AllSigned
PS E:\mswork>
適当なスクリプト ファイルを作って、実行してみます。
PS E:\mswork> "Get-Host" | Out-File Test.ps1

PS E:\mswork> .\Test.ps1
.\Test.ps1 : File E:\mswork\Test.ps1 cannot be loaded. The file E:\mswork\Test.ps1 is not digitally
signed. The script will not execute on the system. For more information, see about_Execution_Polic
ies at http://go.microsoft.com/fwlink/?LinkID=135170.
At line:1 char:1
+ .\Test.ps1
+ ~~~~~~~~~~
    + CategoryInfo          : SecurityError: (:) [], PSSecurityException
    + FullyQualifiedErrorId : UnauthorizedAccess
当然ですが、Test.ps1 がデジタル署名されていないので怒られます。
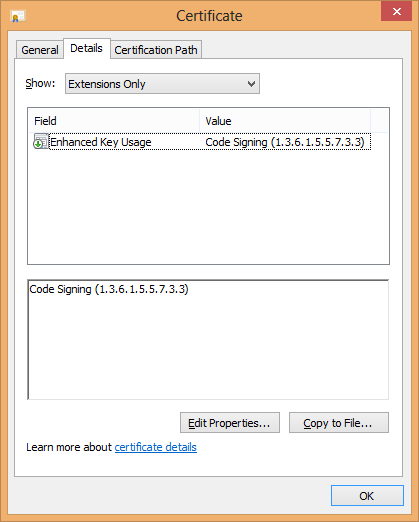
PowerShell スクリプトの署名には、拡張属性の extendedKeyUsage (OID=2.5.29.37) に codeSigning (OID=1.3.6.1.5.5.7.3.3) が設定されている証明書が必要です。
http://www.oid-info.com/get/2.5.29.37
http://www.oid-info.com/get/1.3.6.1.5.5.7.3.3
どんな方法でもいいのですが、今回は certreq で証明書要求を作って Sunakata Root CA で署名します。
まず、certreq で要求を作るための設定ファイルを用意します。設定項目は以下のページを見て下さい。
Appendix 3: Certreq.exe Syntax
http://technet.microsoft.com/en-us/library/cc736326.aspx
;
; policy.inf
;
; http://technet.microsoft.com/en-us/library/cc736326.aspx
;

[NewRequest]
Subject="CN=PowerShell Script Signing"
Exportable=TRUE
KeyLength=2048

[Extensions]
; http://msdn.microsoft.com/en-us/library/windows/desktop/aa379367(v=vs.85).aspx
2.5.29.37 = "{text}1.3.6.1.5.5.7.3.3"
certreq で証明書要求を作ります。
> certreq -new policy.inf ps1sign.req

> openssl req -in ps1sign.req -text
Certificate Request:
    Data:
        Version: 0 (0x0)
        Subject: CN=PowerShell Script Signing
        Subject Public Key Info:
            Public Key Algorithm: rsaEncryption
                Public-Key: (2048 bit)
                Modulus:
                    00:dd:13:1c:85:ba:47:6c:ab:7b:8c:01:4f:78:bd:
                    82:72:30:32:13:c7:9c:0f:69:e7:fc:d9:e4:d8:21:
                    be:ef:1b:a2:50:0e:8d:14:56:11:f0:f4:d6:1f:3f:
                    bf:48:ef:c4:01:58:71:4e:e4:16:dd:b5:4e:eb:3b:
                    e9:6e:82:99:09:29:bf:1e:91:d7:b2:e9:f6:0a:15:
                    48:7a:a1:b6:44:04:64:11:ac:cf:ca:2e:6b:d9:b5:
                    a9:1b:91:22:07:67:fc:8c:67:51:fd:dd:af:63:96:
                    bf:36:62:6a:69:27:f3:02:8e:66:cd:8f:30:ca:98:
                    ee:e7:72:7d:a0:1e:02:0b:a7:52:3f:5d:9e:a5:e4:
                    a7:ec:87:67:fb:51:b5:05:31:97:fc:71:cf:11:f5:
                    b2:5a:77:d9:e4:e7:0e:43:bc:b9:b6:17:f8:40:2e:
                    d6:fb:2a:2b:f1:32:c9:db:60:07:b1:c5:89:93:36:
                    23:f9:25:5c:f8:14:60:47:cc:bc:56:42:63:1f:e6:
                    84:9e:43:34:4c:fd:36:df:66:eb:17:6b:50:e9:79:
                    c0:80:95:05:f0:8e:ca:d3:9b:56:35:12:97:8d:65:
                    5d:d0:4a:2f:e4:af:25:1b:b7:b5:0d:e4:af:5c:30:
                    ae:af:63:0d:74:83:d6:ce:21:0b:47:58:91:88:9e:
                    3a:01
                Exponent: 65537 (0x10001)
        Attributes:
            1.3.6.1.4.1.311.13.2.3   :6.2.9200.2
            1.3.6.1.4.1.311.21.20    :unable to print attribute
            1.3.6.1.4.1.311.13.2.2   :unable to print attribute
        Requested Extensions:
            X509v3 Extended Key Usage:
                Code Signing
            X509v3 Subject Key Identifier:
                74:42:81:6D:9D:64:7A:10:4D:B3:1F:EA:05:85:5B:02:5B:43:62:AA
            X509v3 Key Usage: critical
                Digital Signature
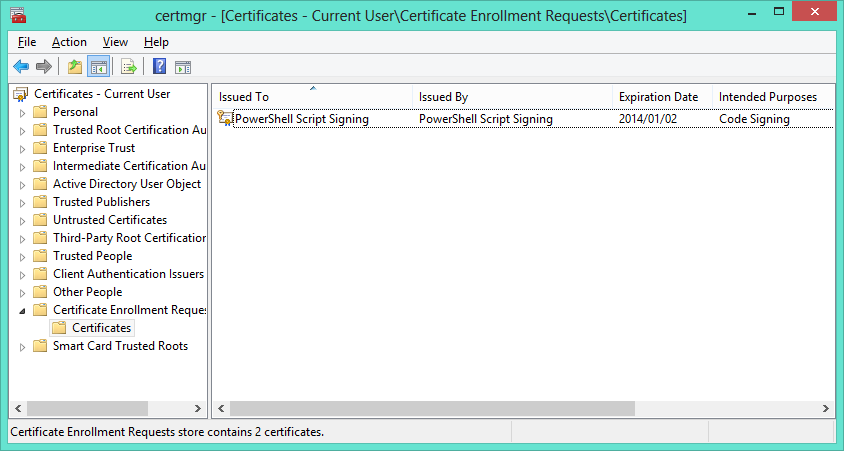
証明書要求ファイル ps1sign.req とともに、証明書ストアの [証明書の登録要求] に秘密鍵が保存されます。
次に、作成した証明書要求に署名を行ないます。
今回は、拡張属性に codeSigning を付けるため、設定ファイル openssl.cfg を編集しないといけません。このへんがちょっと面倒です。openssl.cfg の末尾に、以下の 2 行を追加します。これを忘れると、証明書要求に codeSigning が設定されていても、署名された証明書には拡張属性が設定されません。もっとうまいやり方がありそうなんですがね・・・。
[ v3_extensions ]
extendedKeyUsage=codeSigning
あとは簡単です。
C:\OpenSSL-Win64\work> openssl ca -in ps1sign.req -outdir . -out ps1sign.cer -config openssl.cfg -extensions v3_extensions
Using configuration from openssl.cfg
Loading 'screen' into random state - done
Enter pass phrase for ./demoCA/private/cakey.pem: (CA 秘密鍵のパスワード)
Check that the request matches the signature
Signature ok
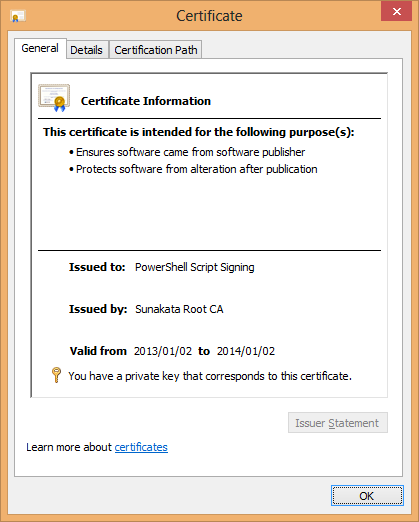
Certificate Details:
Serial Number:
8c:fb:c2:57:59:f8:90:f0
Validity
Not Before: Jan 2 09:02:29 2013 GMT
Not After : Jan 2 09:02:29 2014 GMT
Subject:
commonName = PowerShell Script Signing
X509v3 extensions:
X509v3 Extended Key Usage:
Code Signing
Certificate is to be certified until Jan 2 09:02:29 2014 GMT (365 days)
Sign the certificate? [y/n]: y
1 out of 1 certificate requests certified, commit? [y/n] y
Write out database with 1 new entries
Data Base Updated
署名した証明書を、再び certreq を使ってインストールします。
C:\OpenSSL-Win64\work> certreq -accept ps1sign.cer
これで、個人証明書ストアに秘密鍵つきの証明書が保存されました。
あとは簡単で、Set-AuthenticodeSignature を使って署名するだけです。
PowerShell ドライブの Cert: を使うと証明書ストアをブラウズできるので、作った証明書を探します。
PS E:\mswork> $Certs= gci Cert:\CurrentUser\My
PS E:\mswork> $Certs


    Directory: Microsoft.PowerShell.Security\Certificate::CurrentUser\My


Thumbprint                                Subject
----------                                -------
5ACA55270D5F82044FDCA822AFE4BACEA33515EA  CN=zune-tuner://windowsphone/39d1483b%20-%20e7c93dac%2...
4EEF76D8ADEE8A60D166A4B57E84D9418D3C0BD1  CN=PowerShell Script Signing
3F3675A193F4750ADF7DFC856EAB17F56AE3B35C  CN=Windows Azure Tools
2 番目にあるので $Certs[1] で署名。
PS > Set-AuthenticodeSignature -Certificate $Certs[1] -FilePath .\Test.ps1


    Directory: E:\mswork


SignerCertificate                         Status                       Path
-----------------                         ------                       ----
4EEF76D8ADEE8A60D166A4B57E84D9418D3C0BD1  Valid                        Test.ps1
内容を確認し、実行してみます。
PS E:\mswork> Get-Content .\Test.ps1
Get-Host

# SIG # Begin signature block
# MIIE4QYJKoZIhvcNAQcCoIIE0jCCBM4CAQExCzAJBgUrDgMCGgUAMGkGCisGAQQB
(中略)
# HxsuGy1BhAOXwggkVgrQYUPOclzgxwGPMxicMp+6303y6Hslp1vDZkhgn4x/ppys
# F6B9vww=
# SIG # End signature block

PS E:\mswork> Get-ExecutionPolicy
AllSigned

PS E:\mswork> .\Test.ps1

Do you want to run software from this untrusted publisher?
File E:\mswork\Test.ps1 is published by CN=PowerShell Script Signing and is not trusted on your
system. Only run scripts from trusted publishers.
[V] Never run  [D] Do not run  [R] Run once  [A] Always run  [?] Help (default is "D"): r

Name             : ConsoleHost
Version          : 3.0
InstanceId       : add59fda-6386-4ea6-850d-b7f3943673ea
UI               : System.Management.Automation.Internal.Host.InternalHostUserInterface
CurrentCulture   : ja-JP
CurrentUICulture : en-US
PrivateData      : Microsoft.PowerShell.ConsoleHost+ConsoleColorProxy
IsRunspacePushed : False
Runspace         : System.Management.Automation.Runspaces.LocalRunspace
実行時の “信頼されていない発行元からのソフトウェアを実行しますか?” という警告が気になる場合は、署名に利用した証明書を個人証明書ストアから [信頼された発行元] の証明書ストアに入れておけば、警告が出なくなります。